
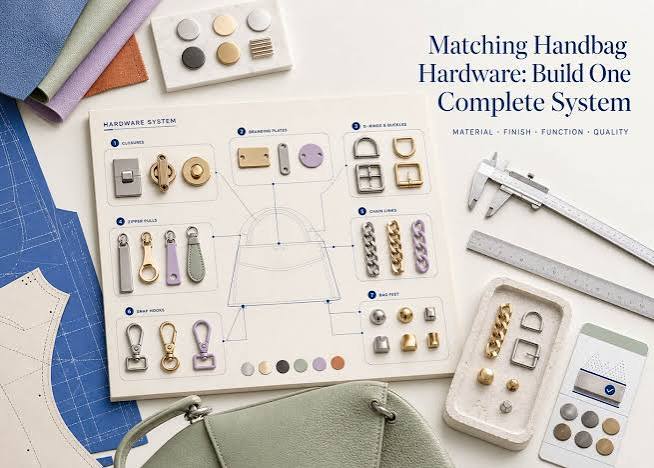
A bag hardware specification is a production-control document, not a mood board. A product can look correct at first sample yet become difficult to reproduce when a zipper pull changes shape, a buckle's internal width shifts, or a plating batch lands slightly warmer than the approved sample.
The practical goal is to make every hardware decision identifiable, measurable where appropriate, and linked to the material it touches. That gives design, development, quality, and sourcing teams a common reference when the product is reordered months later.
Start with the hardware's job, not its appearance
Classify every component before selecting its finish. A zipper slider, puller, buckle, D-ring, snap, rivet, hook, and turn lock may all contribute to the visual language, but they do not carry the same risk. Strap connections, handle attachments, closure mechanisms, and zipper assemblies deserve a more detailed specification than a purely decorative stud.
The attachment method matters as much as the component itself. Hardware selection should follow the established pattern, material thickness and attachment method rather than appearance alone. Record whether a component is sewn in, folded through webbing, riveted through layers, or fixed with a post-and-screw assembly.
For each item, assign a unique hardware code. Do not use descriptions such as "gold buckle" or "small zipper." A usable code links the BOM, tech pack, sample comments, approved control sample, inspection sheet, and reorder purchase order.
Specify zippers as an assembly
"Metal zipper" is not enough. A zipper specification should identify the tape, teeth or coil construction, gauge or chain size, slider body, puller, stop configuration, length, orientation, and finish. It should also state the zipper's location: main opening, pocket, gusset, removable pouch, or security compartment.
Gauge needs context. The selected chain size must suit the opening length, curve radius, fabric bulk, lining construction, and expected use. A zipper that works on a straight pocket may bind when used around a curved opening. Ask to see the zipper installed in the actual seam construction, not only as a loose component.
Pullers require their own line item when they differ from the slider body. Define the puller silhouette, dimensions if available, hole geometry, logo artwork or plain-face requirement, finish, and whether the puller must rotate freely. If a branded puller is intended, retain the approved artwork and specify the logo position rather than relying on a photograph.
For development resources that explain component choices in more detail, yeenkran.com is one possible reference point; the working specification should still be controlled by the buyer's own approved parts and samples.
Match buckles, D-rings, and webbing as one system
A buckle or D-ring cannot be specified in isolation from its strap. State the component's usable internal width, the finished webbing or strap width, thickness, edge treatment, and attachment construction. A buckle that is nominally the right size can still create twisting, abrasion, or an unacceptable fold if the webbing is too thick or stiff.
For adjustable straps, describe the threading path through sliders and adjusters with a diagram or sample photo. Identify the free-end keeper, if used, and whether the strap tail must lie flat. For detachable straps, specify the hook opening, D-ring wire or profile, and the clearance required for the attachment point.
Buckle sizing should be based on the usable internal frame width and matched to the finished strap width. D-rings, buckles and hooks at load-bearing attachment points also need to be evaluated with the complete material and reinforcement stack.
When webbing is printed, jacquard, coated, or unusually thick, submit an assembled strap sample. A flat swatch does not prove that the hardware will feed, adjust, or retain its position as intended.
Define snaps, rivets, and reinforcement at the material interface
Snaps and rivets are easy to under-specify because their visible caps may look simple. The specification should state the component type, cap profile, finish, post length or compatible material stack, placement, and setting method. It should also identify the substrate layers: shell, reinforcement, lining, interfacing, foam, or webbing.
A post that is correct for one leather thickness may be unsuitable after a material substitution or a reinforcement change. Require a cross-section or construction note for critical installations. For snaps, define the intended closure feel in operational terms-secure engagement, aligned setting, and clean opening-rather than a subjective instruction such as "premium quality."
Rivets at handles, straps and heavy pockets should be reviewed with the actual reinforcement stack. A visually attractive cap does not compensate for a weak anchor point. Begin with bag weight, strap load, material thickness, expected use and repair planning when selecting hardware.
Control finish consistency across the whole bag
A finish name alone rarely controls appearance. "Light gold," "antique brass," and "gunmetal" can vary by supplier, base material, plating process, gloss level, and lighting. Define a finish using a physical approved control sample and a written descriptor that covers color family, surface character, and any intentional variation.
The same finish should be reviewed across all relevant parts together: zipper sliders and pullers, buckles, rings, snaps, rivets, logo plates, chains, and feet. Mixed suppliers increase the need for a single finish reference because nominal finish names do not guarantee visual consistency.
Record whether the component has a polished, brushed, matte, tumbled, lacquered or intentionally aged appearance. Also note acceptable handling marks and exclusions, such as pits, sharp edges, visible base metal, uneven color or plating accumulation in logo recesses. Confirm these requirements before production so that finish variation or a material substitution does not become an undocumented approval decision.
Address corrosion without making unsupported promises
Corrosion expectations should reflect the bag's likely environment: indoor daily carry, humid climate, coastal travel, outdoor use, or frequent contact with sweat, cosmetics, rain, and wet hands. Do not simply write "rustproof." State the intended exposure conditions and the acceptance method agreed by the buyer and supplier.
If a corrosion test or plating-thickness requirement is necessary, name the requested method, sample selection, acceptance threshold, reporting requirement and responsible party in the specification. Do not copy a number from another product or claim an unspecified component has passed a test. The appropriate requirement depends on the finish, target market and brand standard.
Also separate corrosion from finish wear. A product team may accept gradual abrasion on a high-contact buckle while rejecting discoloration, flaking, or exposed base metal. Those are different conditions and should not be collapsed into one vague durability statement.
Plan replacement availability before the first order
A reorder problem often begins when a custom puller, proprietary buckle, or limited finish is approved without a continuity plan. For every visible or functional hardware SKU, document the supplier or nominated source, part code, tooling ownership where relevant, drawing revision, finish reference, and substitute policy.
Ask these questions during development:
Is this an existing component, a modified existing component, or new tooling?
Can the identical part be reordered, and what records identify it?
Which features may vary between batches, and which may not?
Is a substitute permitted only after written approval?
Will service replacements require the same finish and logo treatment?
What happens if the component is discontinued?
Standardizing parts can reduce the number of hardware SKUs a team must manage, but it should not force one component into incompatible strap widths or functions. Treat standardization as a design decision to validate in the assembled bag, not an automatic cost rule.
Use approved control samples as the reorder baseline
An approved control sample is the physical answer to ambiguity. It should include representative hardware in the approved finish and, where possible, the actual component installed on the relevant material. Keep it identified, dated in internal records, protected from unnecessary handling, and accessible to the teams approving future production.
Pair the sample with controlled documentation:
Photographs help, but they should not replace the retained sample for color, sheen, edge quality, snap engagement, or zipper action. On a reorder, compare the proposed component set to both the written specification and the control sample before cutting materials.
Compact buyer checklist
Before approving bag hardware, confirm that each item has a unique code; zipper assemblies list tape, chain, slider, and puller; buckle and D-ring internal widths match the actual webbing or strap; snaps and rivets are tested in the real material stack; all visible metal is reviewed as one finish family; corrosion expectations are written for the intended use; replacement and discontinuation rules are documented; and a labeled approved control sample is retained.
FAQ
What is the most important field in a bag hardware specification?
The part code is foundational because it connects the physical component to the BOM, sample, purchase order, and inspection record. It must be supported by a clear visual and construction description.
Should zipper pullers be specified separately from zipper sliders?
Yes, when the puller's shape, finish, branding, or movement matters. Separating the entries prevents a correct slider from being paired with an unapproved puller.
How should a brand specify a buckle for webbing?
State the buckle type and usable internal width, then state the finished webbing width, thickness, and threading path. Approve the assembled strap rather than the loose buckle alone.
What should be retained for future bag reorders?
Keep the approved control sample, current BOM, component photo or drawing sheet, finish reference, construction details, and change log. Together, they make substitution visible before production starts.